Introduction
This is a manual for working with the MoveMonitor using McRoberts hardware DynaPort 6 (MM & MM+) and DynaPort 7 (DP7). Both DynaPort hardware versions are operated in the same way and are mostly referred to in this manual as ‘DynaPort’. For specific differences, the hardware type will explicitly be mentioned. It is recommended to follow the steps in this manual prior to the first measurement to familiarize yourself with the device and its settings. With the index on the left hand side of this page you can quickly navigate to the paragraph of interest.
Account Registration
Each user needs to create a MyMcRoberts account. To begin the registration process, please visit the following link: https://my2.mcroberts.nl/register
Upon arrival, you'll be prompted to enter specific information to set up your personal account. Please reach out to McRoberts for a Registration Code.
After entering the required information, click on the 'Create Account' button. Subsequently, keep an eye on your inbox for a confirmation email containing further instructions to finalize the registration process. Emails could end up in your spam folder based on local settings, so check that as well.
Before first use
The DynaPort can be controlled via the website https://my2.mcroberts.nl. All steps, from preparing the measurement to viewing the reports take place here.
Download installer
After your first login a pop-up will appear with the request to download a small software package, the DynaPort Manager. Download this software in order to establish a connection between your DynaPort device(s) and the MyMcRoberts web portal. Please follow the wizard to install the software. This needs to be done for each computer that you use the DynaPort on.
Preparing the device for a measurement
Charging the device
It is important to charge the DynaPortd shortly before starting a measurement to ensure maximal measurement capacity. If the battery runs empty during the measurement, the measurement will prematurely stop.
Battery life
In order to protect the Lithium-Ion battery in this product, devices should be stored in a fully charged state in low ambient temperatures. Devices in prolonged storage should be recharged to this level every three months.
How to charge
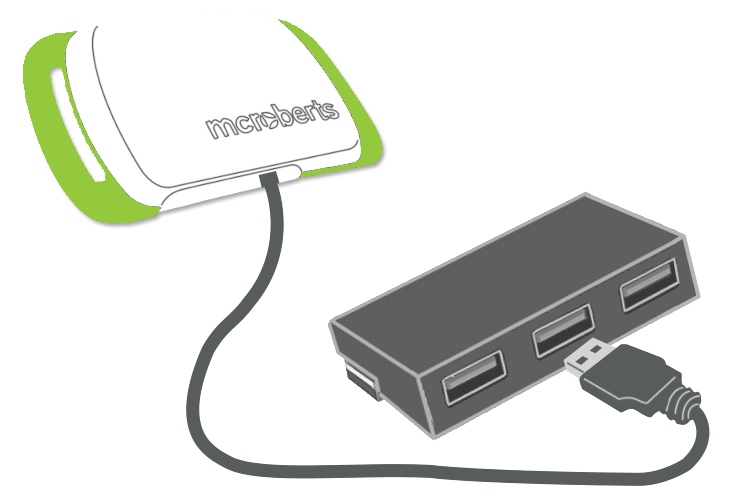
The device can be charged by connecting it to a PC or USB adapter with the supplied USB cable. Multiple devices can be charged at once by using a powered USB-hub. Charging takes up to 5 hours for MM(+) and 3 hours for DP7 devices.
After the device has been connected to a power source for 5 minutes, the device will go into battery saving mode. The green blinking light will turn off, but the device will still be charging.
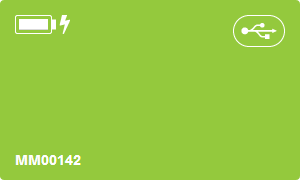
LED status
While the DynaPort is connected the LEDs give information about the charging status.
MM(+)Blinking green means that the device is currently charging. The green LED on means that the device is fully charged.
Red blinking = low battery
Orange blinking = 5-75%
Green blinking = 75-95% or a measurement has just started (only the first few minutes)
Green steady = 95-100%
Blue = Connected to PC
Starting a measurement
The DynaPort needs to be programmed in order to measure.
Devices tab
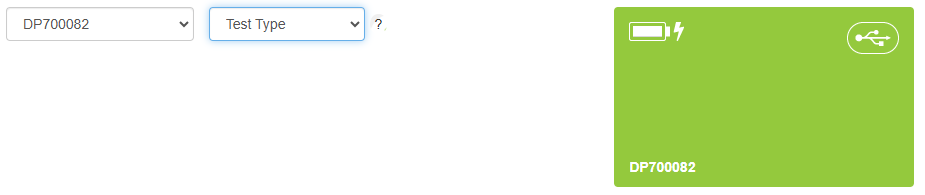
When you connect a DynaPort to your computer a green (MM & DP7) or brown (MM+) information tile will appear for each connected device in the Devices tab. The tile displays the device number (lower left corner), the battery status (upper left corner), and that it is connected via USB (upper right corner).
Make sure to give Windows some time to recognize the device and install drivers, this will happen automatically. Only then the DynaPort Manager can connect successfully to any DynaPort devices.
Choose a device
Click on a tile (device) to start a new measurement with that device. You can also directly select the Measure tab to do this. Using the DynaPort 7, you can conduct both MoveMonitor and MoveTest assessments. To choose the assessment you'd like to perform, simply select the desired option from the Test Type dropdown menu.

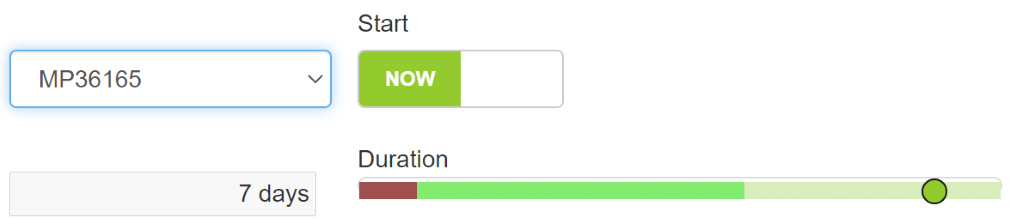
Select measurement characteristics
Select the starting time of the measurement; this can either be now or later. Thereafter, a measurement duration should be selected. The maximal measurement duration for each DynaPort type is:
MM - 15 full days
MM+ and DP7 - 7 full days
NOTE: for DP7 devices intermediate charging is possible to allow measurements with a longer measurement duration. Contact McRoberts for more information regarding intermediate charging.
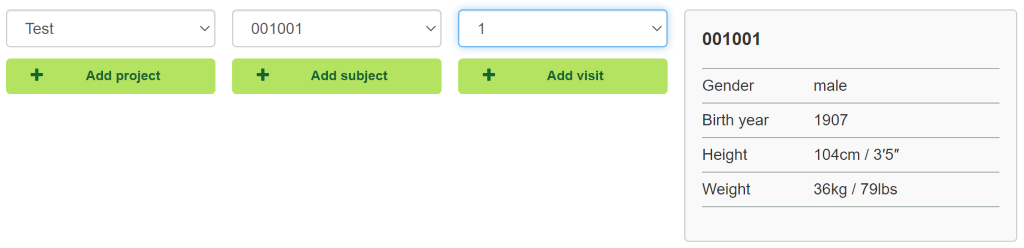
Project and subject characteristics
Add or select a project, subject and visit in order to start a measurement.
- Using different projects is useful for organizing your data.
- Subject characteristics have to be added for each new subject.
- Visits refer to different measuring moments. If there is only one measuring moment (visit), fill in a random number as visit number and in the future this visit number will appear as a default setting.
Start
The device can be started with the 'START MEASUREMENT'-button when all the necessary information for a new measurement has been supplied. The device can be disconnected from the computer when the program notifies you to do so. After disconnecting, the LEDs will blink for about 10 seconds after which the DynaPort will go into standby mode. When the selected start time is reached the DynaPort will start measuring. During the first few minutes of the measurement the green LED will blink.

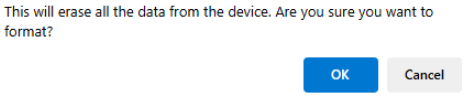
If a selected device already contains a measurement, the device needs to be wiped first using the blue button at the bottom of the screen. A new measurement cannot be started if a device contains an existing measurement.

Confirm the wiping of the device by clicking 'OK' in the presented pop-up window:
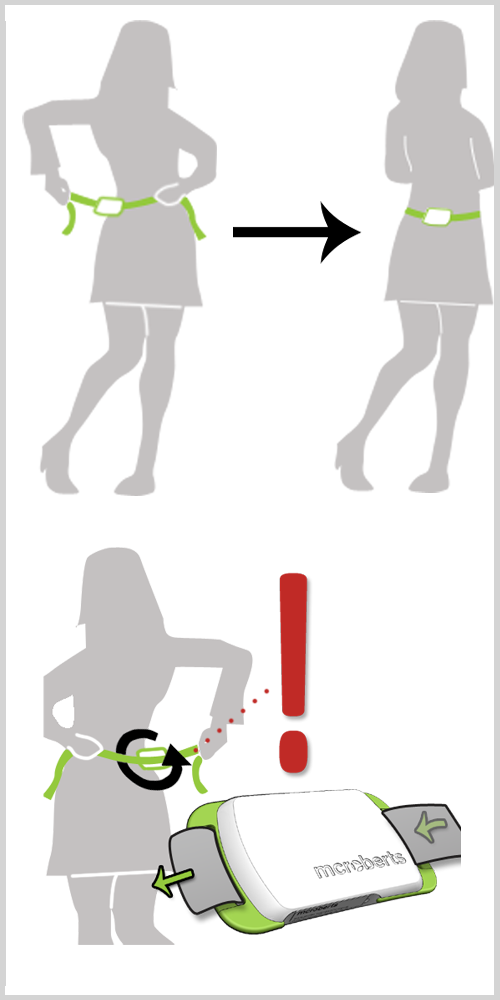
Wearing the device
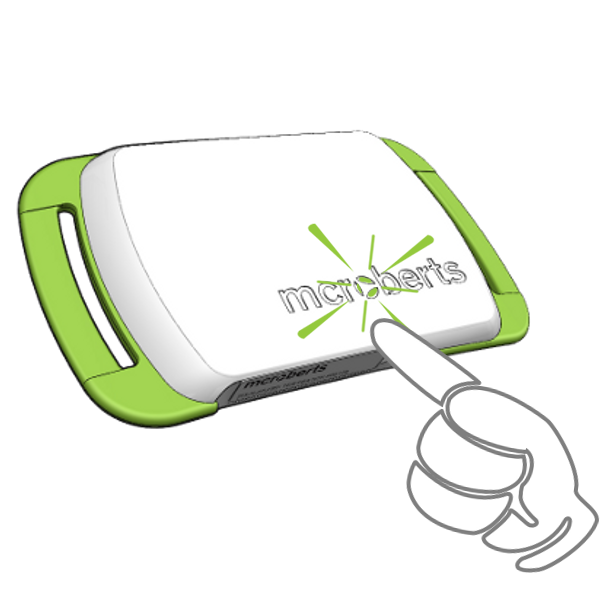
The device should be worn around the waist, at the middle of the lower back. The engraved McRoberts logo should be readable and the waist belt should be on the inside. It can be worn directly on the skin or over a thin layer of clothes. Please note that the DynaPort is not waterproof, so it is not suitable for showering, bathing or swimming.
Processing the data
The collected data needs to be uploaded to McRoberts' online portal MyMcRoberts after measuring. After a successful upload one or multiple reports of the measurement will be generated, depending on the software modules you have purchased.
Automatic uploading
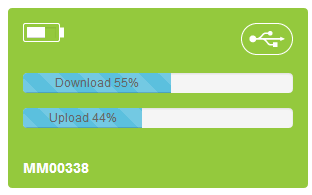
Log in to MyMcRoberts and attach the DynaPort to the computer with the USB cable. The data will be automatically downloaded from your device to your hard disk. Downloaded data will be uploaded to one of our servers for analysis. A green or brown information tile will appear that shows the processing status.
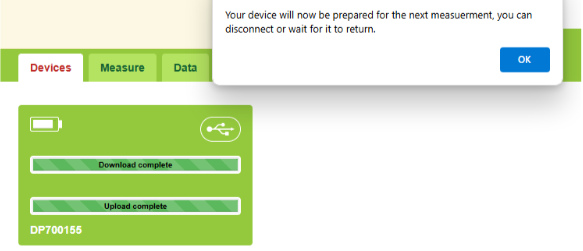
Once the data has been uploaded successfully, data on the device will be wiped so that the device can be used for a next measurement:
Measurement statuses

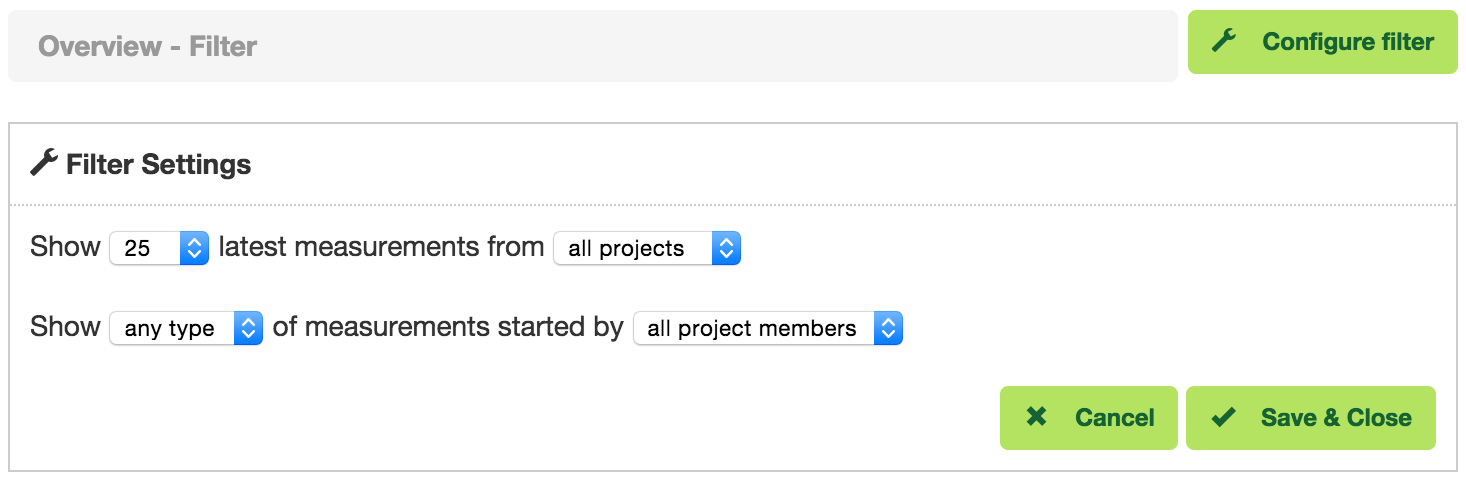
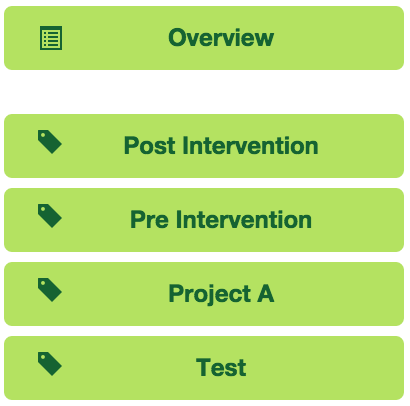
The following overview of measurement statuses is presented to you when you click the on 'overview' button on the left-hand side of the screen. This overview is shown by default when you click on the tab 'Data'. With the ‘Configure filter’ button you can set the filter settings in order for you to only see the statuses of the measurements you are interested in.

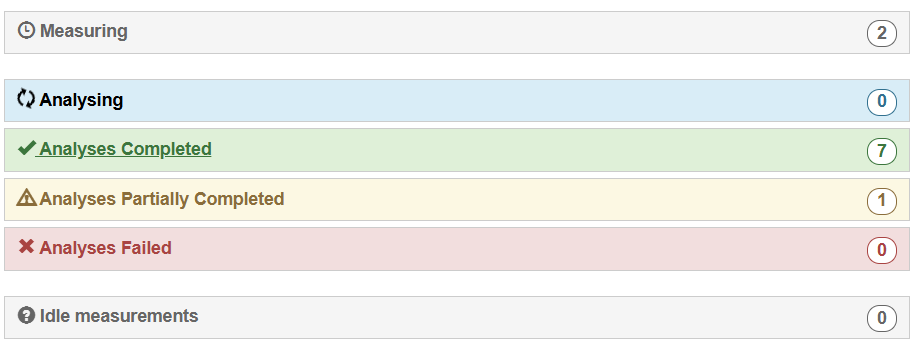
Click on a status to view the individual measurements belonging to that status. The number in each status tab shows how many measurements have that particular status.
Each measurement status will be explained below.
Measuring
All measurements that are currently being performed are shown here. This overview shows the time left until a certain measurement has finished and it shows when a measurement is 'ready for upload'. In that case you only have to couple your DynaPort to the PC to start the upload.
Analysing
Measurements that have just been uploaded are displayed under the 'Analysing' tab until the analysis of this measurement is completed.
Analyses Completed
When the analysis of a measurement is completed and reports are ready to be viewed, the measurement is displayed under the 'Analyses completed' tab. Click on a measurement to view or download the reports. All reports for which you have purchased a license are visible here.
Analyses Partially Completed
This measurement status can only apply to MoveTest measurements.
Analyses Failed
When the software fails to analyse a measurement it will be displayed under the 'Analysis failed' tab'. The McRoberts Support Team will be notified of such an analysis failure and will fix the problem or otherwise contact you.
Idle measurements
Any measurement that's not in any of the categories above is considered "idle" and will be shown here. This is usually because you don't have the appropriate licenses to start analysis. Contact McRoberts if you wish to take further actions.
Project data
Click on a project to view the subjects, visits and shared users of that project. Via subjects you can navigate to the measurement(s) belonging to that subject.
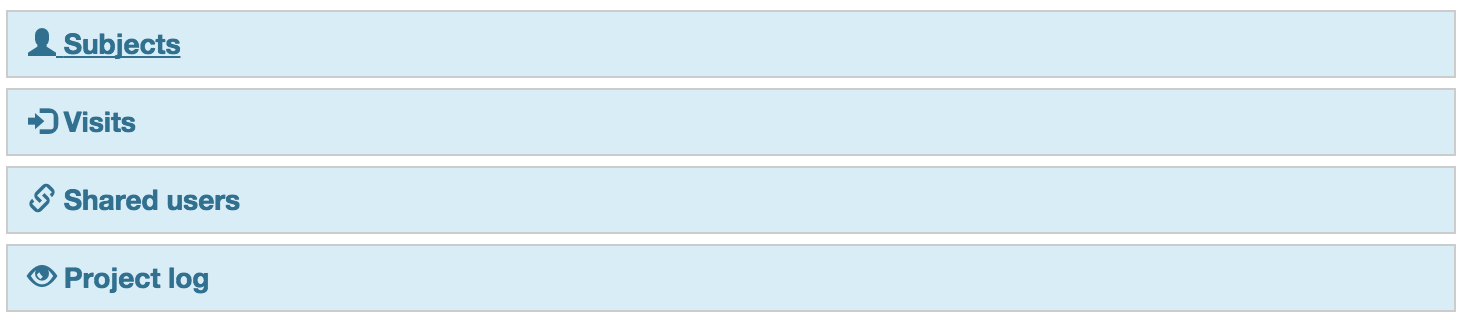
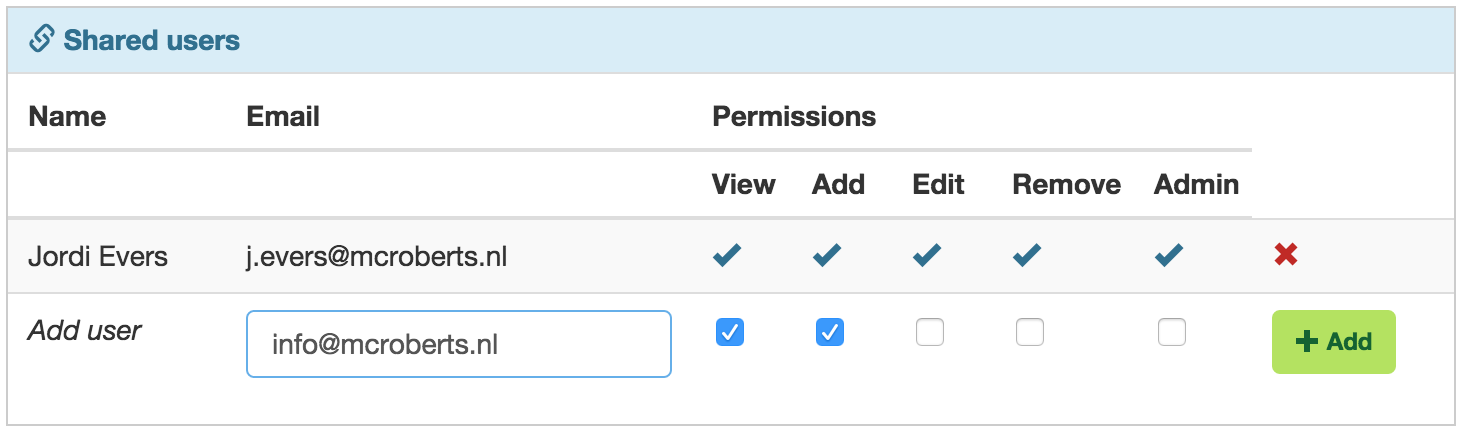
Shared users
A project can be shared with colleagues. To do this, click on the button 'shared users', fill in an email address and assign 'permissions' to him or her for this project. Make sure that the colleague that you add already has a MyMcRoberts account; the email address must be recognised by MyMcRoberts. The first 4 permissions refer to the data. By making someone 'Admin' he or she has the rights to add people to and withdraw people from the project.