Introduction
This is a manual for working with the MoveTest using McRoberts hardware DynaPort MT and DynaPort 7. It is recommended to follow the steps in this manual prior to the first measurement to familiarize yourself with the device and its settings. With the index on the left hand side of this page you can quickly navigate to the chapter of interest.
Account Registration
Each user needs to create a MyMcRoberts account. To begin the registration process, please visit the following link: https://my2.mcroberts.nl/register
Upon arrival, you’ll be prompted to enter specific information to set up your personal account. Please reach out to McRoberts for a Registration Code.
After entering the required information, click on the ‘Create Account’ button. Subsequently, keep an eye on your inbox for a confirmation email containing further instructions to finalize the registration process. Emails could end up in your spam folder based on local settings, so check that as well.
Before first use
Download installer
The DynaPort MT can be controlled from the website https://my2.mcroberts.nl. All steps, from performing a measurement to viewing the reports take place here.
After your first login, a pop-up will appear with the request to download a small software package. Download this software in order to establish a connection between your DynaPort MT device(s) and the software on My Mcroberts. Please follow the wizard to install the software. This software must be installed on each computer that you use the DynaPort MT on.
Preparing the device for a measurement
Charging the device
It is important to charge the DynaPort MT to ensure maximal measurement capacity. If the battery runs empty during the measurement, the measurement will prematurely stop.
How to charge
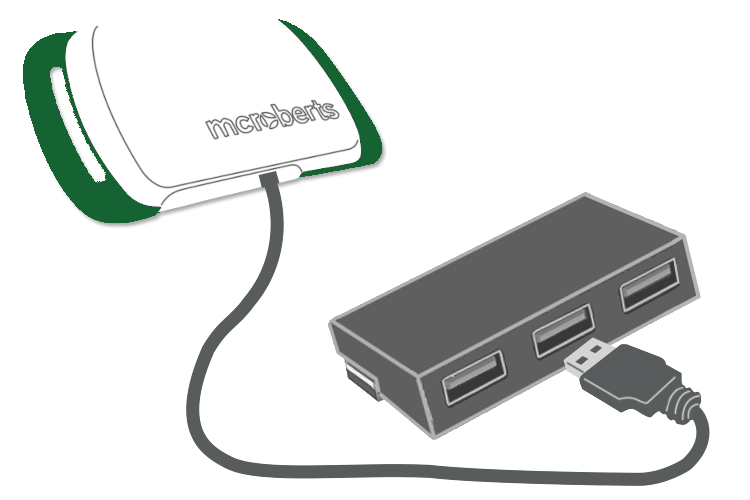
The device can be charged by connecting it to a computer with the supplied USB cable. Multiple devices can be charged at once by using a powered USB-hub. Charging takes up to 5 hours.
LED status
While the DynaPort is connected the LEDs give information about the charging status.
DynaPort MT(+)
Blinking green means that the device is currently charging. The green LED on means that the device is fully charged.
Red blinking = low battery
Orange blinking = 5-75%
Green blinking = 75-95% or a measurement has just started (only the first few minutes)
Green steady = 95-100%
Blue = Connected to PC
Setting up a measurement
Devices tab
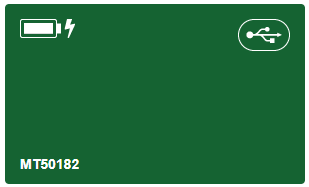
Connect your DynaPort MT using a USB cable. A dark green information tile will appear in the Devices tab for each connected DynaPort MT. The tile displays the device number (lower left corner), the battery status (upper left corner). Make sure to give Windows some time to recognize the device and install drivers, this will happen automatically. Only then can the DynaPort manager connect successfully to any DynaPort devices.
Choose a device
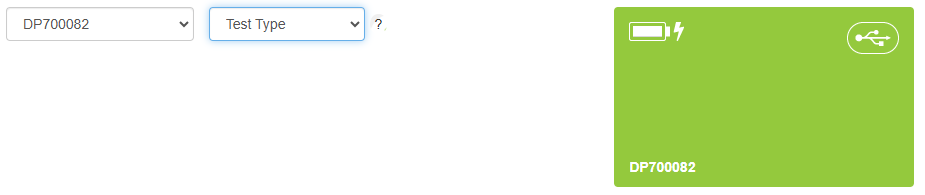
Click on a tile (device) to start a new measurement with that device. You can also directly select the Measure tab to do this. Using the DynaPort 7, you can conduct both MoveMonitor and MoveTest assessments. To choose the assessment you’d like to perform, simply select the desired option from the Test Type dropdown menu.

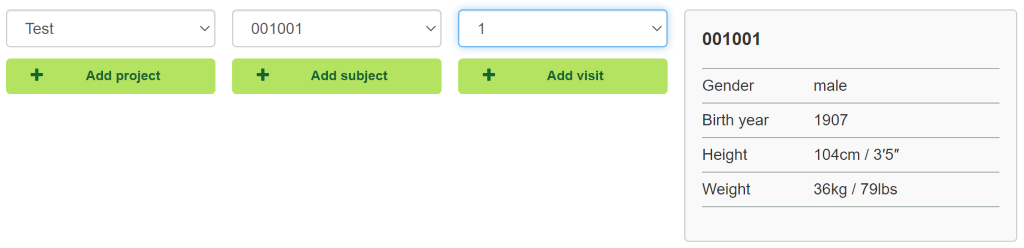
Project and subject characteristics
Add or select a project, subject and visit in order to start a measurement.
- Using different projects is useful for organizing your data.
- Subject characteristics have to be added for each new subject.
- Visits refer to different measuring moments. If there is only one measuring moment (visit), fill in a random number as visit number and in the future this visit number will appear as a default setting.
Click Start measurement when all fields are filled.

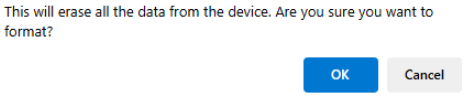
If a selected device already contains a measurement, the device needs to be wiped first using the blue button at the bottom of the screen. A new measurement cannot be started if a device contains an existing measurement.

Confirm the wiping of the device by clicking ‘OK’ in the presented pop-up window:
Protocol
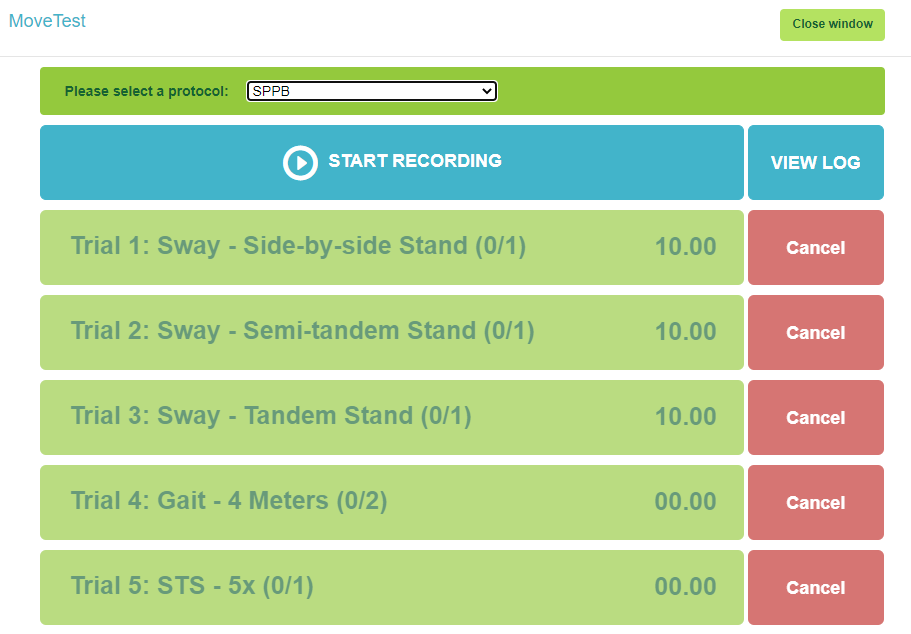
Select the protocol you want to use for a measurement from the appearing drop-down menu.

Only the generic protocol will be available if you do not make use of customized protocols. Please contact sales@mcroberts.nl for information about customized protocols.
Performing a measurement
It is recommended to read the paragraph How to perform a MoveTest prior to collecting data. This short manual provides instructions on how to prevent errors in the analysis due to the execution and marking of the tests.
Measurement interface
The measurement interface will be shown when a protocol is selected. Click on the ‘Start recording’ button to start the measurement. This will take a few moments.
Once the message is shown to disconnect the DynaPort, do so, and attach the DynaPort MT to your subject before you proceed with measuring.

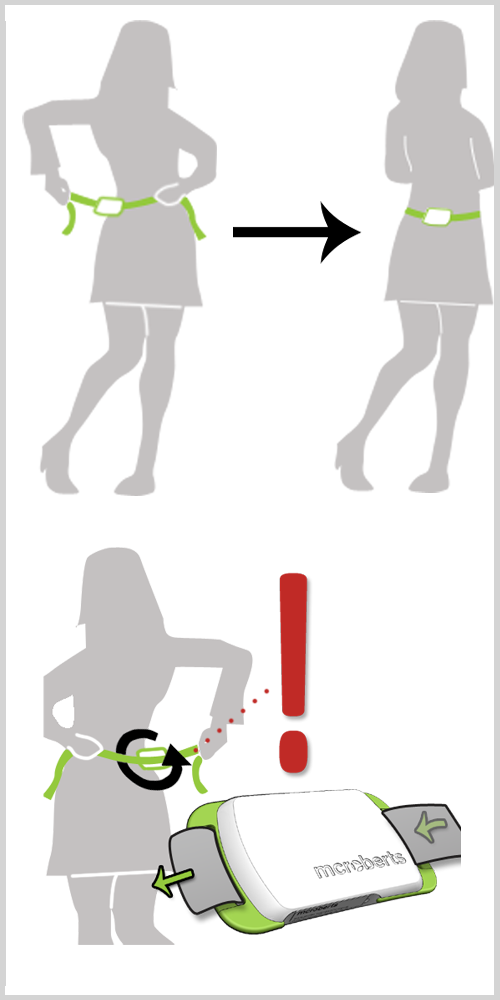
Wearing the device
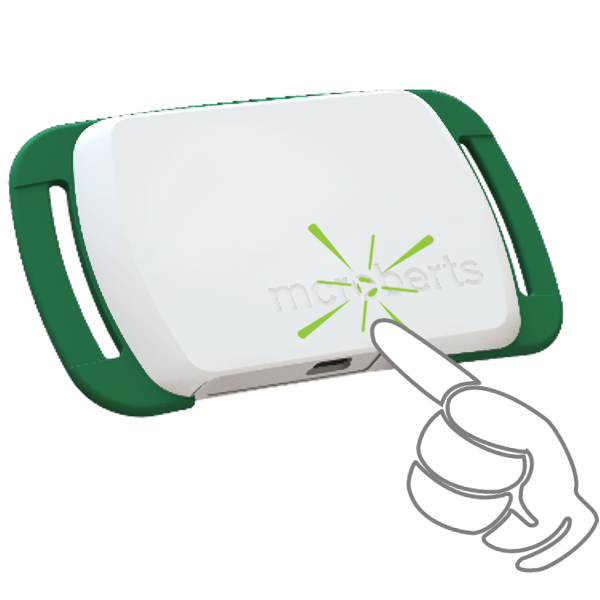
The device should be worn around the waist, at the middle of the lower back. The engraved McRoberts logo should be readable and the waist belt should be on the inside. It can be worn directly on the skin or over a layer of clothes.
Please note that the DynaPort MT is not waterproof
Event markers
Different event markers can be sent to the DynaPort MT by mouse clicking the event marker-buttons that are now enabled, or by using the keyboard keys. Event marker buttons are designed to mark the beginning and end of named intervals in the measured signal. They can also be set remotely with a Wireless Presenter. An auditive signal is provided when each marker is set. The next paragraph will explain how to do this.
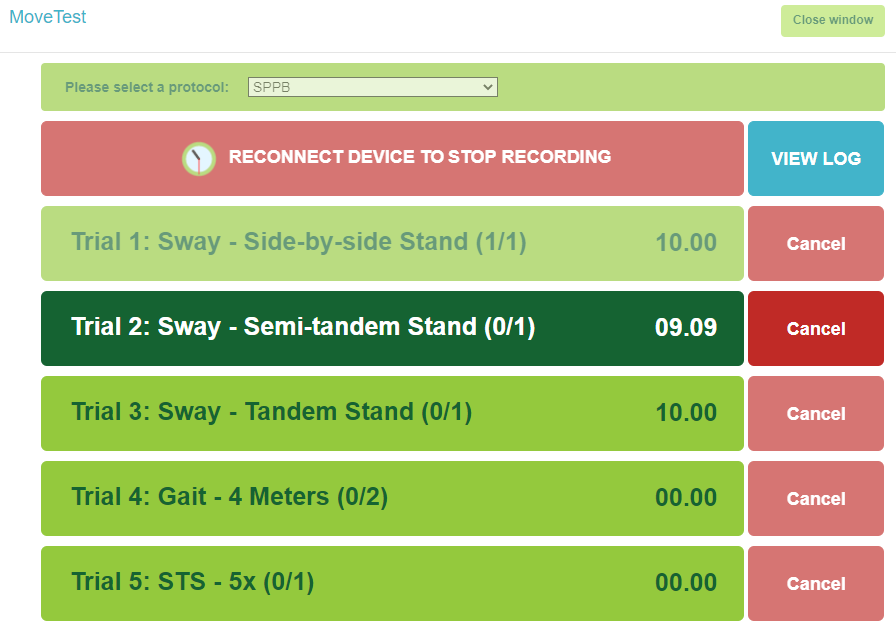
A button can have three states:
green: Marker-button is active, measurement is currently not being performed.
dark green: A task is currently performed. Use the same marker button to mark the end of the task.
faded green: The button is disabled and cannot be used. Usually, this is is beacause the button was already used.
If a trial fails or if you accidentally place a start marker, you can delete this with the cancel button.
When the measurement is finished, reconnect the device to stop the recording. Wait until the device is recognized by your computer and click on the ‘Stop recording’ button to stop the measurement.

The keyboard keys to control the interface are as follows:
Start/stop recording = Page Down key
Start/stop tests (i.e. press the marker buttons) = Page Down key
Cancel = Page Up key
Skip test = F5 key
Remote control
Starting and stopping tests can also be performed remotely with a Wireless Presenter, instead of by mouse-clicking or by using the keyboard. This way you can freely move around the room -within the vicinity of the computer- and assist or instruct your subject. We recommend to use this presenter because of its operating distance and stable connection.
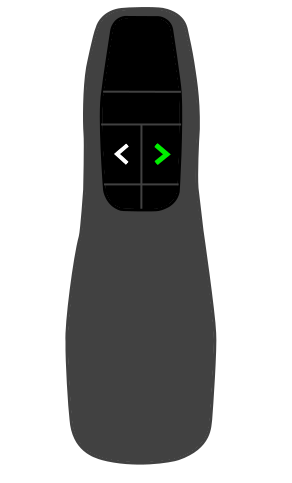
With the right arrow button on the presenter you can start/stop the test items (setting markers).

With the left arrow button you can cancel a test where after you can start it again with the right arrow button.
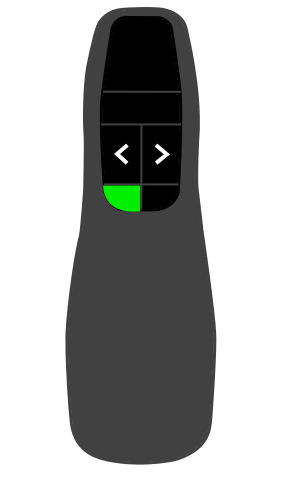
The F5/esc or ‘start presentation’button can be used to skip tests in the protocol when they cannot be performed for some reason.
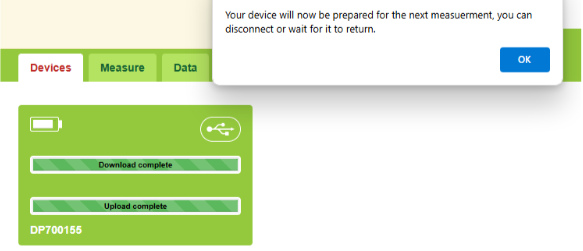
Processing the data
The collected data needs to be uploaded to My McRoberts. After a succesful upload one or multiple reports of the measurement will be generated, depending on the software modules you have purchased.
Start the upload process
Connect the device again using the USB cable when you want to stop the measurement. Click the ‘Stop recording’ button to stop the measurement and initiate the upload process of for the measurement. Once the data has been uploaded successfully, data on the device will be wiped so that the device can be used for a next measurement:
Measurement statuses
All information about currently performing and performed measurements is visible in the tab ‘Data’. Managing your data and viewing/downloading results takes place here.

The following overview of measurement statuses is presented to you when you click the on ‘overview’ button on the left-hand side of the screen. This overview is shown by default when you click on the tab ‘Data’.

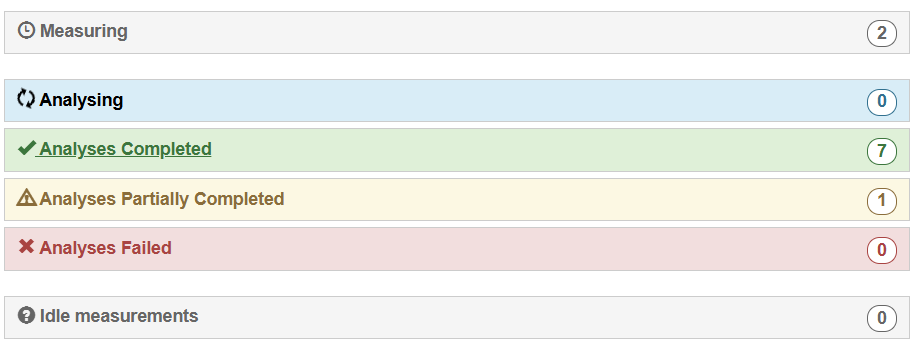
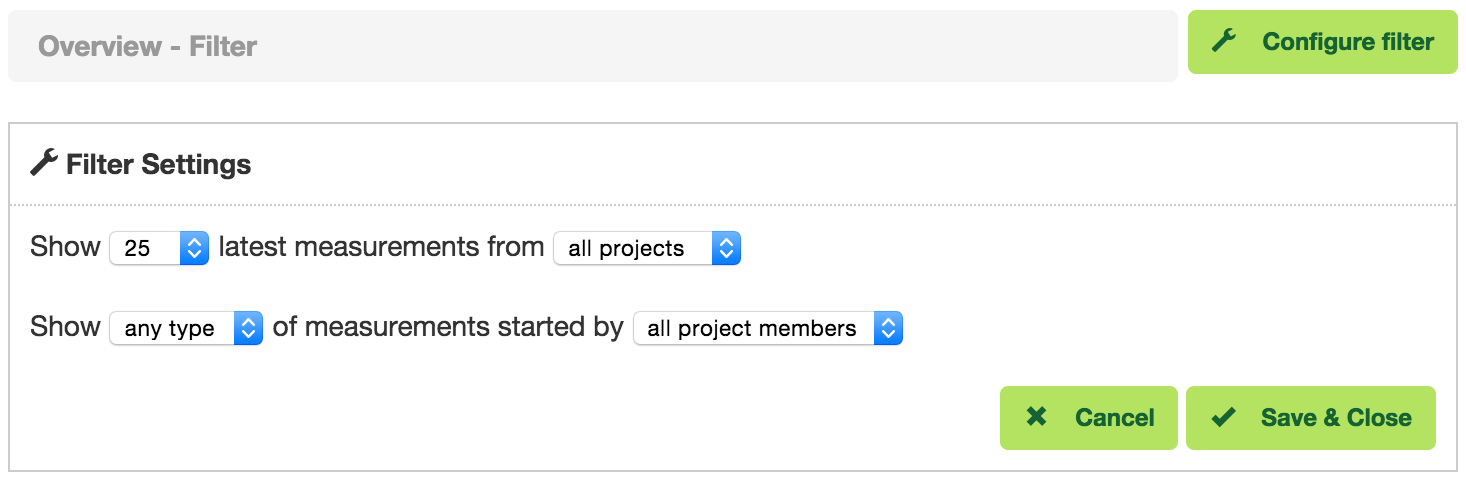
With the ‘Configure filter’ button you can set the filter settings in order for you to only see the statuses of the measurements you are interested in.
Click on a status to view the individual measurements belonging to that status. The number in each status tab shows how many measurements have that particular status.
Each measurement status will be explained below.
Measuring
Measurements that have been performed but were not yet uploaded to the McRoberts servers are shown here. When this is the case for a measurement you have to couple the DynaPort MT where the measurement is on to your PC to start the upload process.
Analysing
Measurements that have just been uploaded are displayed under the ‘Analysing’ tab until the analysis of this measurement is completed.
Analyses Completed
When the analysis of a measurement is completed and reports are ready to be viewed, the measurement is displayed under the ‘Analysis completed’ tab. Click on a measurement to view or download the reports. All reports for which you have purchased a license are visible here.
Analyses Partially Completed
This status is assigned to a measurement when only part of the MoveTest analysis is successful. Click on measurements with this status to view the results for the test items that were analyzed successfully.
Analyses Failed
When the software fails to analyse a measurement it will be displayed under the ‘Analysis failed’ tab’. The McRoberts Support Team will be notified of such an analysis failure and will fix the problem or otherwise contact you.
Idle measurements
A measurement that is not in any of the categories above is considered “idle” and will be shown here. This is usually because you don’t have the appropriate licenses to start the analysis. However, the raw data files can be downloaded from here to analyse yourself in e.g. MATLAB. Contact McRoberts if you wish to use our dedicated analysis software.
Project data
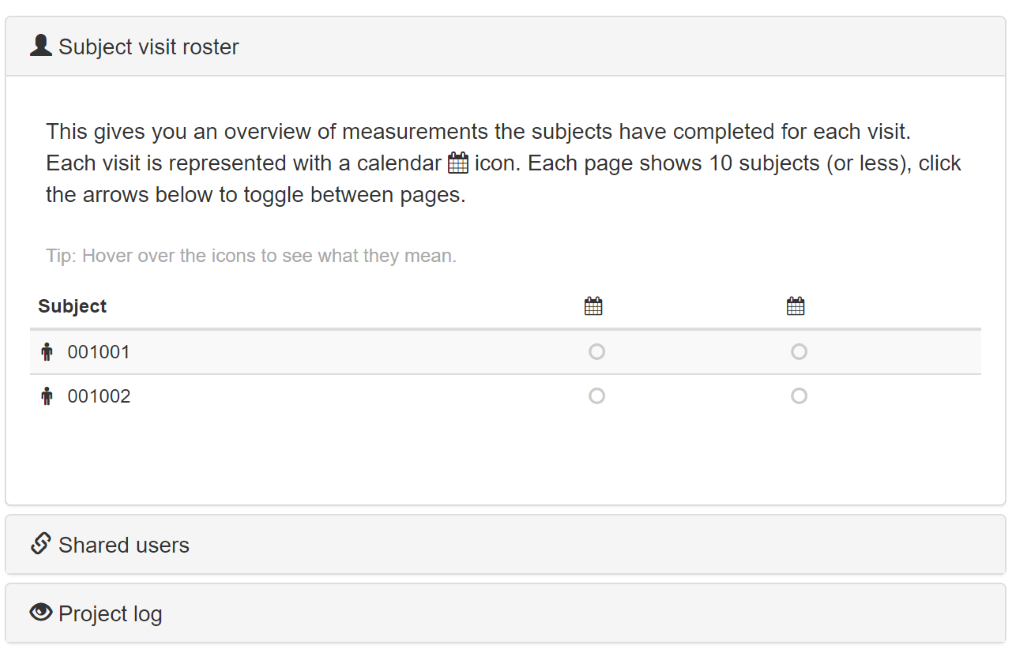
Measurements can also be viewed per project. All your projects are displayed below the ‘overview’ button on the left-hand side of the screen.
Click on a project to view the subjects, visits and shared users of that project. Via subjects you can navigate to the measurement(s) belonging to that subject.
Raw data
Raw data that is uploaded to My McRoberts -for analysis- can also be downloaded from it. All users from a certain project (see the next paragraph ‘Shared users’) can this way download raw data from My McRoberts that is collected by themselves or by any other user of that project. Contact sales@mcroberts.nl for a research toolbox to process your raw data.
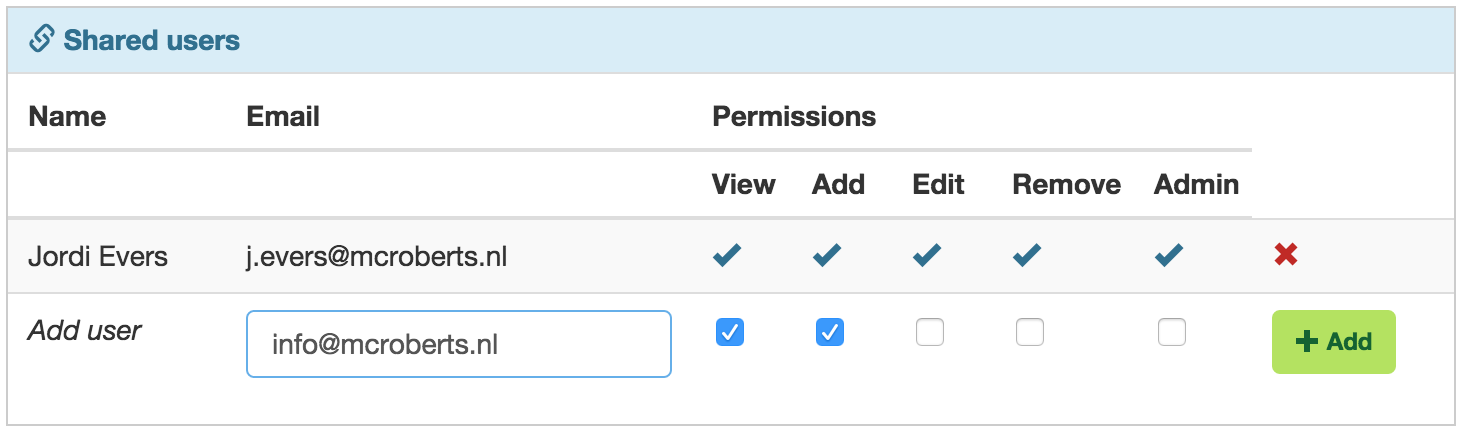
Shared users
A project can be shared with colleagues. To do this, click on the button ‘shared users’, fill in an email address and assign ‘permissions’ to his or her for this project. Make sure that the colleague that you add already has a My McRoberts account; the email address must be recognised by My McRoberts.
The first 4 permissions refer to the data. By making someone ‘Admin’ he or she has the rights to add people to and withdraw people from the project.
How to perform a MoveTest
This chapter provides guidelines on how to perform physical performance tests with the McRoberts MoveTest by means of some simple tips and tricks.
Our analysis software is sensitive to how tests are executed. Therefore, errors in the analyses may occur when the tests are not executed in accordance with our guidelines. This document aims to standardize the execution of performance tests with the MoveTest, in order to prevent errors and increase comparability.
General
Placement of markers in the data: Performed tests should be marked with a start and a stop marker that mark the time interval of the test. The analysis software searches for these markers before the analysis of the signal can start. Therefore, the start of the test should be well within this marked interval to ensure that it is analysed properly (see the figure below). The same accounts for the end of the test. If a trial fails or if you accidentally place a start marker, you can delete this with the cancel button.
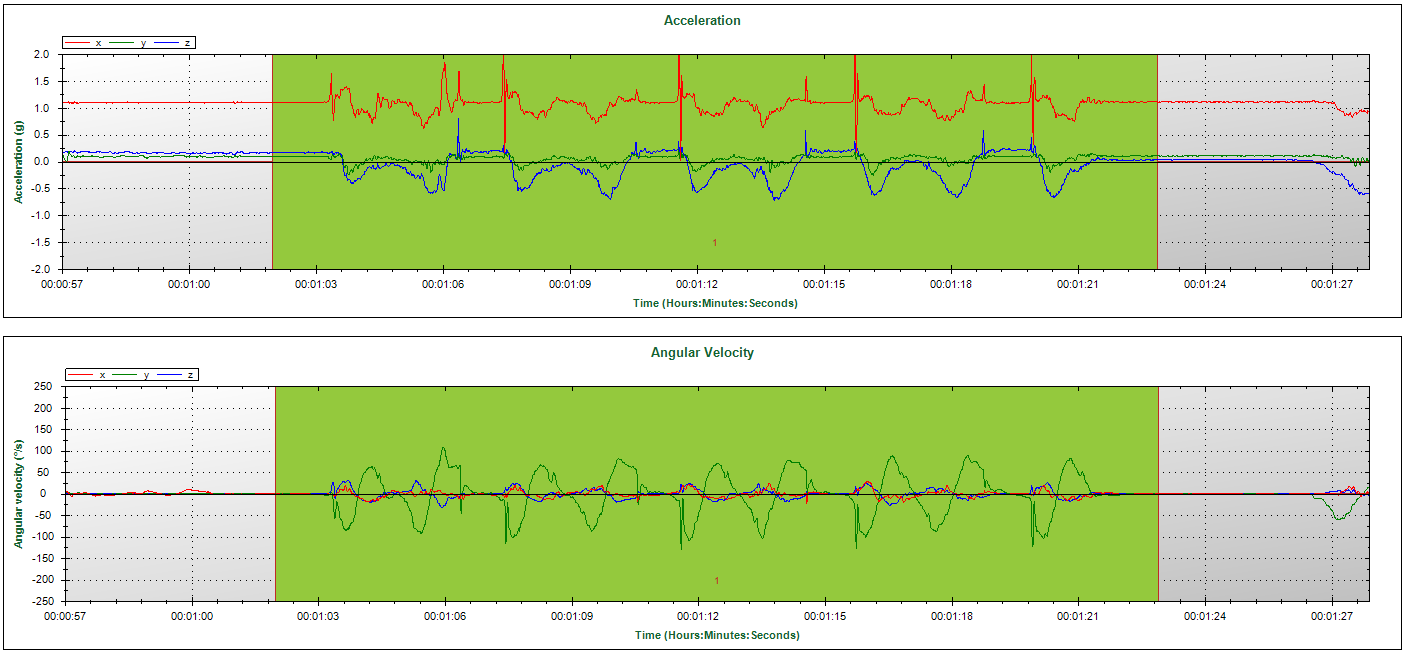
The green plane indicates the marked time interval. The left panel shows a too tightly marked Sit to Stand Test; the test started before the start marker. The right panel shows the same test but correctly marked.
Sit-to-Stand Test
Make sure that the subject starts the test and ends each cycle of the test with his or her back against the back of the chair. Also, after standing up, the trunk needs to be fully extended (see the figure on the right-hand side). Repeat the Sit to Stand 5 times and end with the back against the back of the chair.
Timed Up and Go Test
As with the Sit to Stand Test, the start and end of the Timed Up and Go Test (TUG Test) should be with the subjects’ back against the back of the chair. Since subjects will walk after they stand up during the TUG Test, full extension of the trunk is not an issue here.
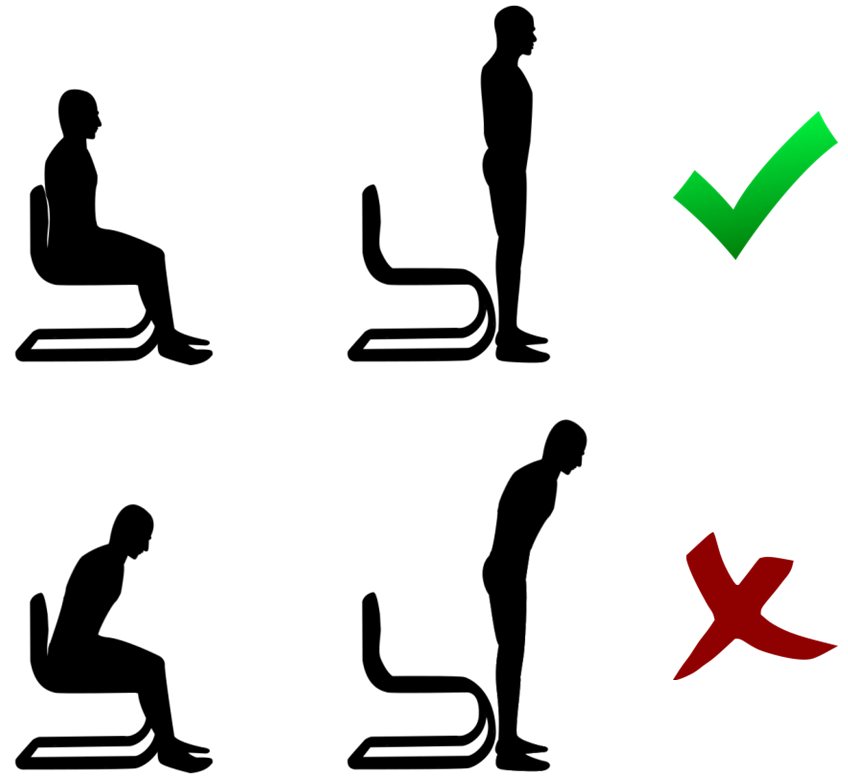
The two upper images display a correct execution of the Sit to Stand Test. The two lower images display an execution of the test that could lead to analysis errors.
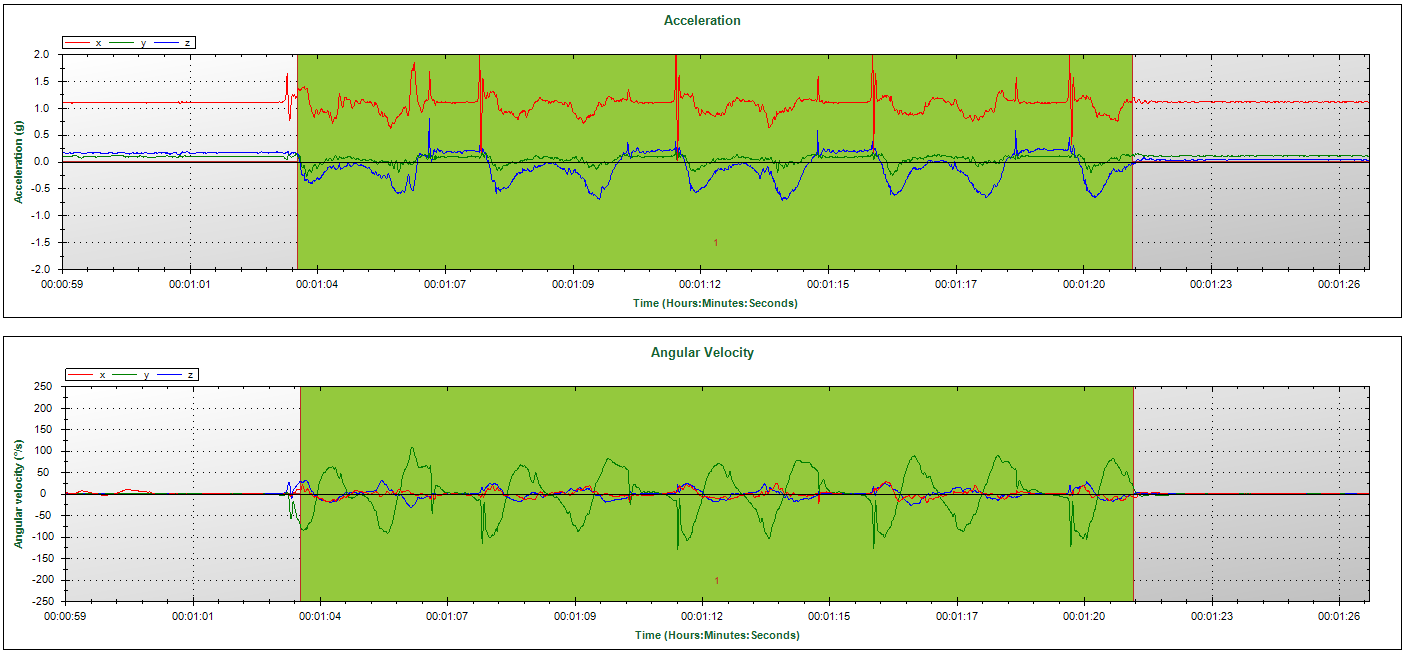
TUG Tests are often performed more than once in sequence (e.g. repeated trials or double tasks). The analysis software needs to recognize the different trials. So, the end of a trial and the start of a subsequent trial should not be too close to each other. To avoid this, make sure that the subject sits still for a few seconds between the trials. This also allows for correct placement of the markers, as indicated in the chapter ‘General’. This can be achieved by clearly informing the subject to wait for instructions on when to start the next trial.
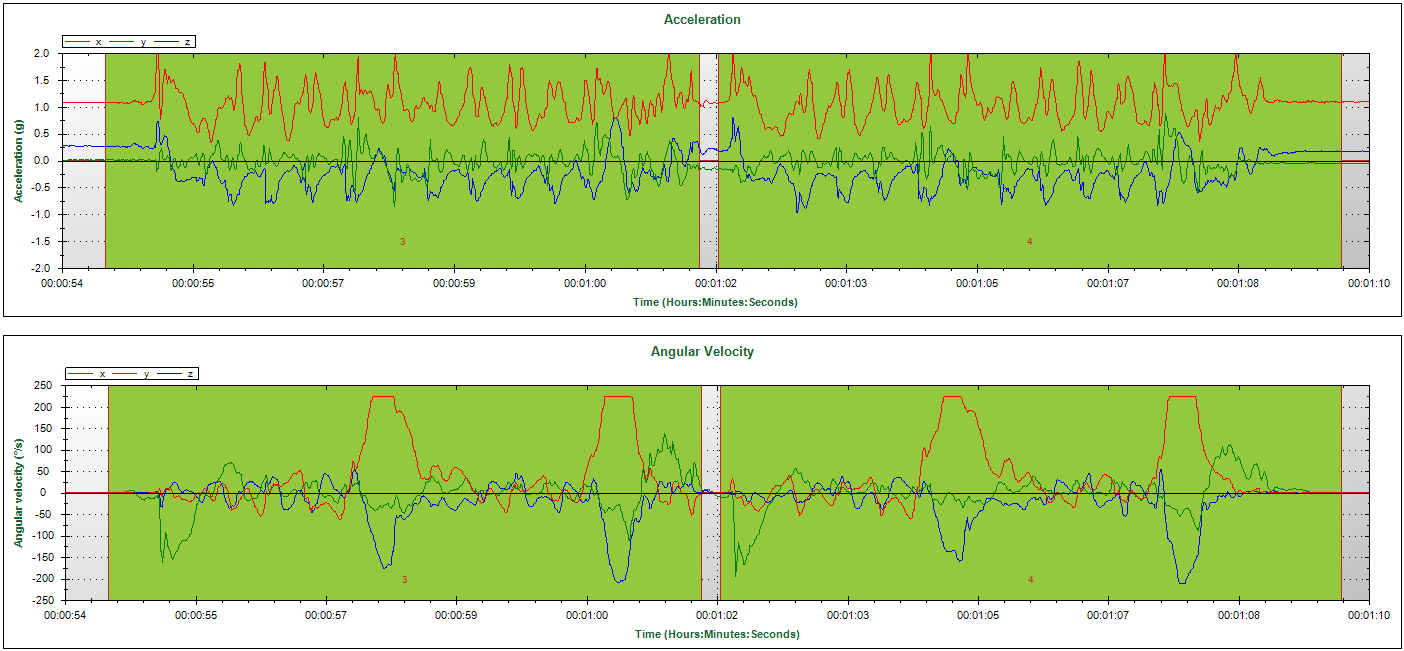
The green plane indicates the marked time interval. The left panel shows two trials with too few time between them (i.e. no clear dissociation between the end of the first trial and the start of the second trial). The right panel shows two trials with appropriate time between them.
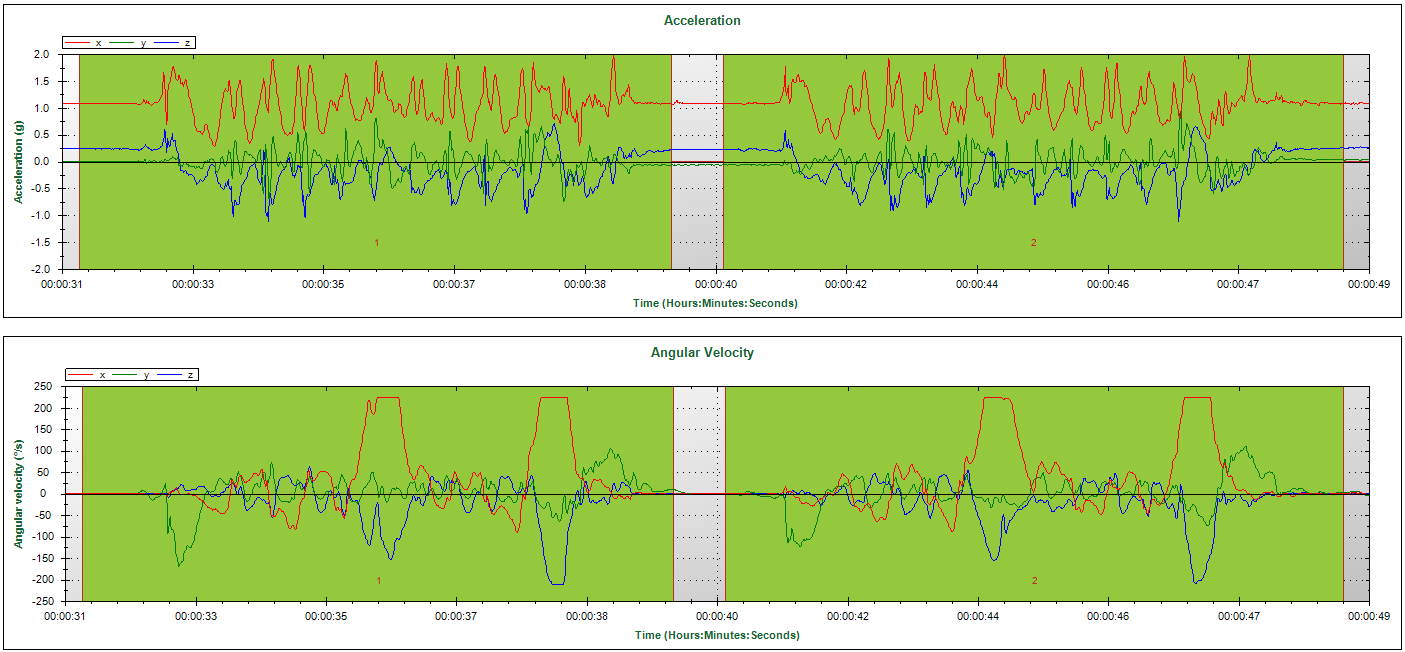
GaitTest
To ensure errorless analysis of the data, the setup depicted below is recommended. Ask the subject to walk back and forth between the pylons. Mark the passing of the lines of the “steady state trajectory”, using the remote control.
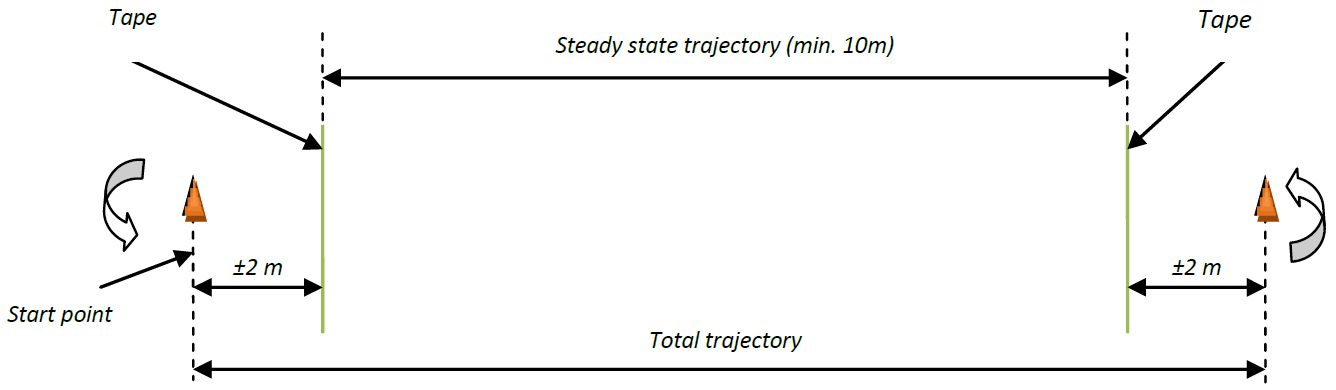
A recommended setup for the Gait Test.
Avoid turns in the gait trajectory, this will influence outcome parameters and step detection
SwayTest
The instructions below guide you in how to perform a reliable Sway Test.
Instructions:
- Stand next to the subject to help him/her into the preferred position (e.g. side-by-side, semi-tandem or tandem).
- Supply just enough support to the subject’s arm to prevent loss of balance.
- When the subject has gained his/her balance in the required position, ask “Are you ready?”
- Then let go and place the first marker as you say, “Ready, begin”.
- The second marker is automatically placed when the programmed time has passed. Hereafter, say “Stop”.
When the subject steps out of position or grabs your arm, stop the current trial. The trial will be regarded as not completed.
Please note that for Sway Tests, start and stop markers cannot be edited afterwards since for Sway Tests these cannot be identified visually.
6-Minute Walk Test
This test can be performed on a straight trajectory with a length between 10 and 50 meters. The software does not support rectangular or circular trajectories; there should be clear 180° turns in the trajectory. The instrumented 6-Minute Walk Test can be performed in the same way as a the non-instrumented version. This means that walking aids may be used and that intermittent resting is allowed.
The test is being started by clicking the marker button or remote control button once. This will trigger the 6-minute count down. After 6 minutes the end marker will automatically be set. No markers should be placed during the performance of the test!
