Introduction
This manual describes how to use the MoveTest with McRoberts hardware:
DynaPort MT
DynaPort 7 (DP7)
Both hardware versions are operated in the same way and are generally referred to as DynaPort. Where differences apply, the specific device type is mentioned.
It is recommended to go through this manual before your first measurement to become familiar with the device and workflow.
Account Registration
Each user must create a MyMcRoberts account.
1. Go to:
https://my2.mcroberts.nl/register
2. Enter the required information
3. Enter your Registration Code (provided by McRoberts)
4.Click Create Account
You will receive a confirmation email with further instructions.
Check your spam folder if needed.
Before First Use
All steps, from preparing measurements to viewing reports, are performed via https://my2.mcroberts.nl
Install DynaPort Manager
After your first login:
1. A pop-up will appear prompting you to download the DynaPort Manager
2. Install the software using the wizard
3. Repeat this for each computer you use
This software enables communication between your device(s) and the platform.
Preparing the Device for a Measurement
Charging the Device
Charge the DynaPort before use to ensure full measurement capacity.
If the battery runs out during a measurement, it will stop prematurely.

Battery Maintenance
To protect the Lithium-Ion battery:
Store devices fully charged
Keep in cool environments
Recharge every 3 months during storage
How to Charge
Connect the device via USB to a PC or adapter
Use a powered USB hub for multiple devices
Charging time:
MT: up to 5 hours
DP7: up to 3 hours
LED Status Indicators
MT
Blinking green→ charging or measurement just started (for the first 5 minutes, while disconnected)
Solid green→ fully charged

DP7
Red blinking → low battery
Orange blinking → 5–75%
Greenblinking → 75–95% or measurement just started (for the first 5 minutes, while disconnected)
Green steady → 95–100%
Blue→ connected to PC
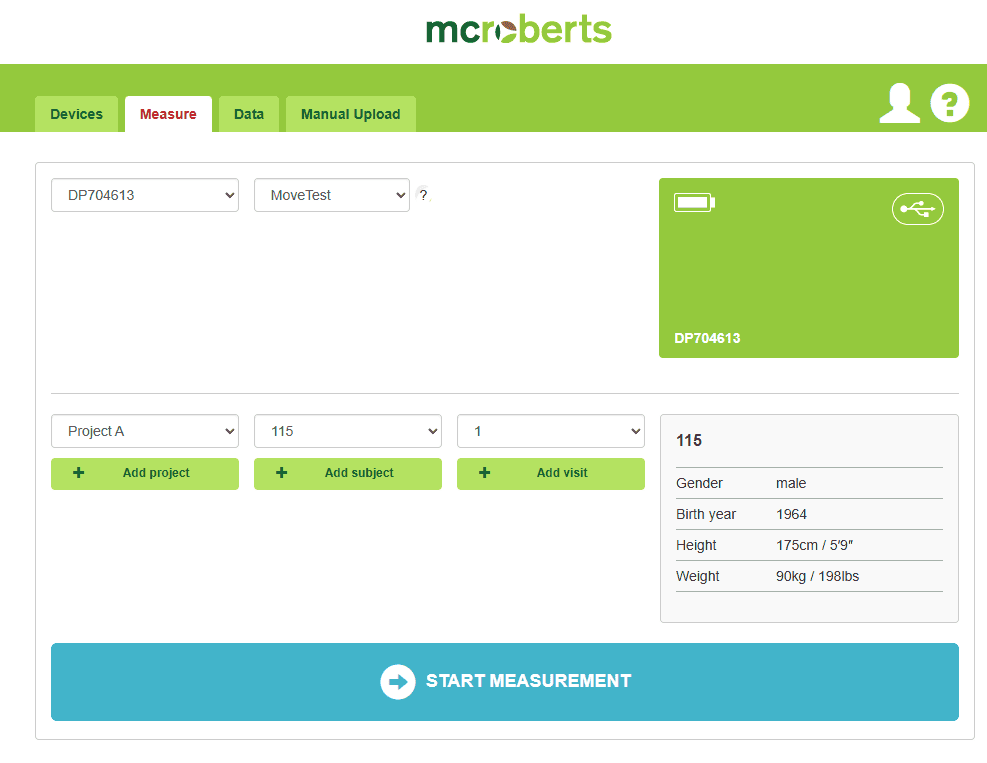
Starting a Measurement
Devices Tab
When connecting a DynaPort:
A tile appears for each device
Shows:
Device numberBattery status
USB connection
Allow Windows time to recognize the device before proceeding.

Select a Device
Click a device tile or go to the Measure tab.
For DP7:
Choose Test Type:
MoveMonitor
MoveTest

Project & Subject Setup
Add or select a project
Add or select a subject (required per participant)
Define or select a visit (time point)
Use a default if only one visit

Start Measurement
Click Start Measurement when all required fields have been completed.
Important
If the device contains data:
Click the blue wipe button
Confirm by clicking OK
A new measurement cannot start otherwise.


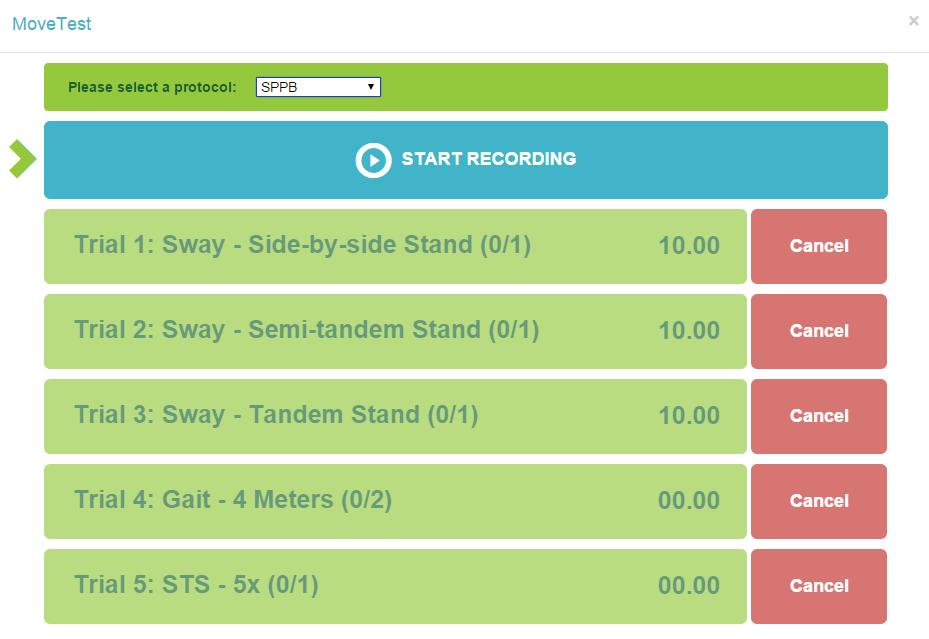
Select Protocol
Select the protocol for your measurement from the dropdown menu.
If no customized protocols are available, only the generic protocol will be shown.

Contact sales@mcroberts.nl for information about customized protocols.
Performing a Measurement
It is recommended to review the section How to Perform a MoveTest before collecting data. This helps prevent errors during analysis.
Measurement Interface
After selecting a protocol, the measurement interface appears.
• Click Start recording
• Wait a few moments for initialization
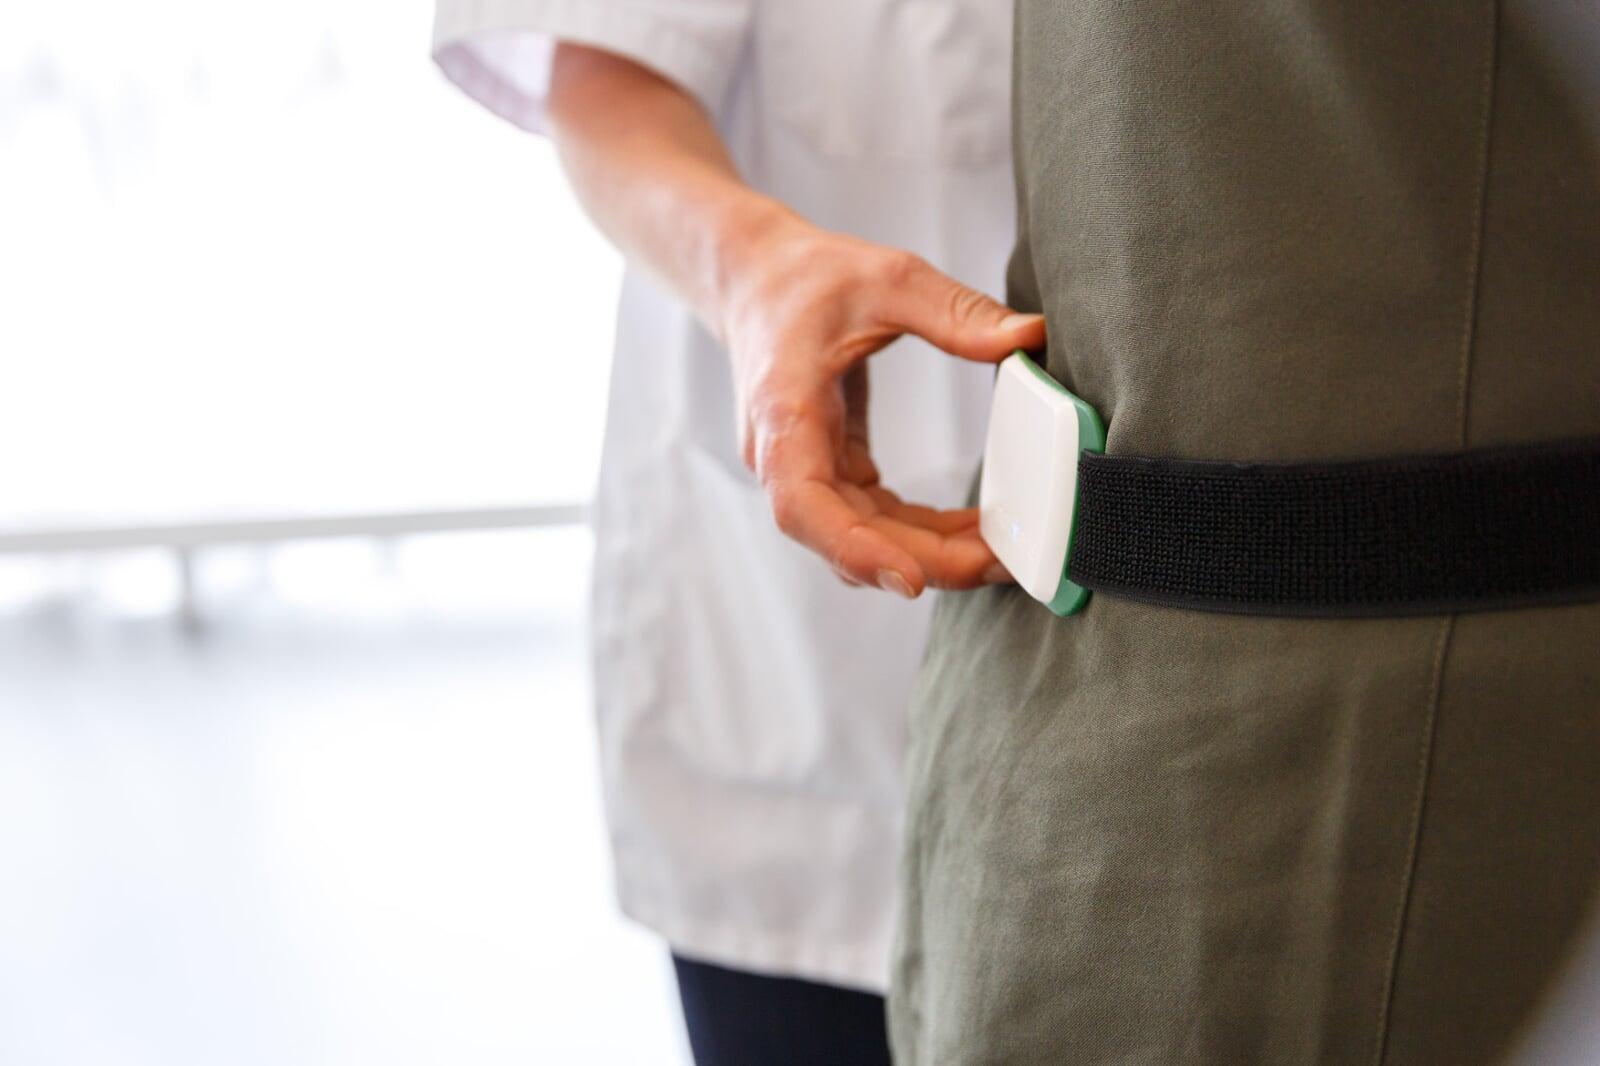
When prompted:
• Disconnect the device
• Attach the DynaPort MT to the subject

Wearing the Device
Position: lower back (waist level)
Orientation:
Logo readable
Belt on the inside
Can be worn:
Directly on skin
Over thin clothing
⚠️ The device is not waterproof
Do not use during:
Showering
Bathing
Swimming
Event Markers
Event markers define the start and end of test intervals.
They can be set by:
• Clicking marker buttons
• Using keyboard keys
• Using a wireless presenter
An audio signal confirms each marker.
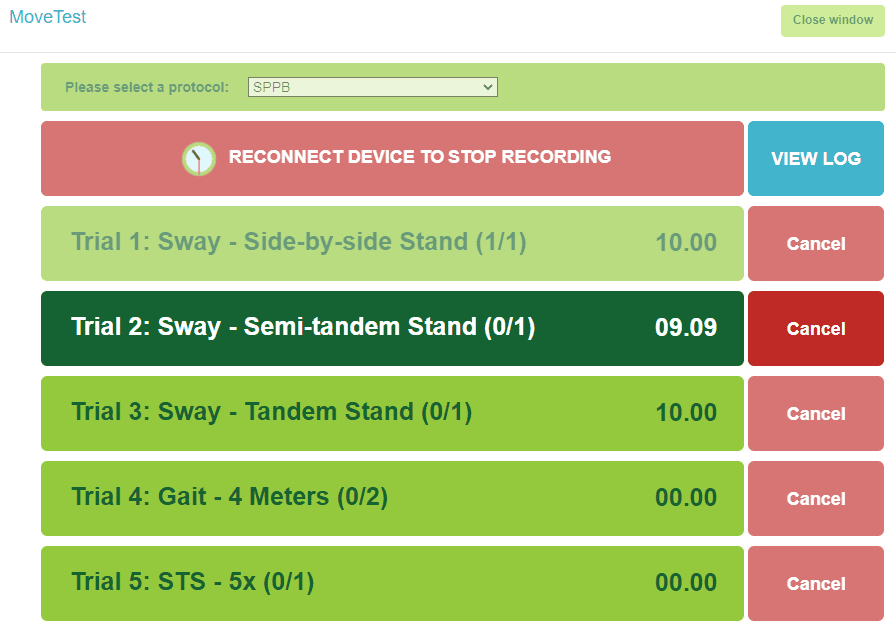
Marker Button States
• Green → ready (no measurement active)
• Dark green → test in progress (press again to stop)
• Faded green → disabled
Keyboard Controls
Start/Stop recording → Page Down
Start/Stop tests → Page Down
Cancel → Page Up
Skip test → F5
Remote Control
A wireless presenter can be used to control the measurement.
This allows you to move freely while guiding the subject.
Controls
• Right arrow → Start/stop test (markers)
• Left arrow → Cancel test
• F5 / Start presentation → Skip test

Correcting Errors
If a trial fails or a marker is placed incorrectly, use the Cancel button to remove it. The trial becomes available again. This can only be done while a test is in progress. After cancelling, the trial can be re-selected.
Stopping and Processing the Measurement
When finished:
Reconnect the device
Wait for recognition
Click Stop recording
Data upload starts automatically

After measurement is stopped, data processing is triggered automatically.
Data will:
Download to the local PC
Upload to McRoberts servers
Be processed into reports
A status tile shows progress.
After upload:
Device is automatically wiped


Measurement Statuses
All measurements are managed in the Data tab.
Use Configure filter to customize your view.


Measuring
Active measurements
Shows remaining time
Indicates when ready for upload
Analysing
Data uploaded
Analysis in progress
Analyses Completed
Reports ready
Click to view/download
Analyses Partially Completed
Only part of the analysis was succesful. Click on a measurements to view the results for the test items that were analysed successfully.
Analyses Failed
Analysis error occurred
McRoberts Support is notified
Idle Measurements
No active processing
Often due to missing licenses
Project Overview
View measurements per project
Navigate:
Project → Subject → Visit → Measurement


Sharing Projects
Go to Shared Users
Enter email address
Assign permissions
Requirements:
User must have a MyMcRoberts account
Permissions:
Data access rights
Admin rights (manage users)

How to Perform a MoveTest
This section provides guidelines to ensure reliable and consistent measurements.
Incorrect execution may lead to analysis errors.
General Guidelines
Each test must be marked with:
• A start marker
• A stop marker
Make sure the test is fully contained between the start and stop markers to ensure succesful analysis of the test.
If needed, use the Cancel button to remove incorrect markers.
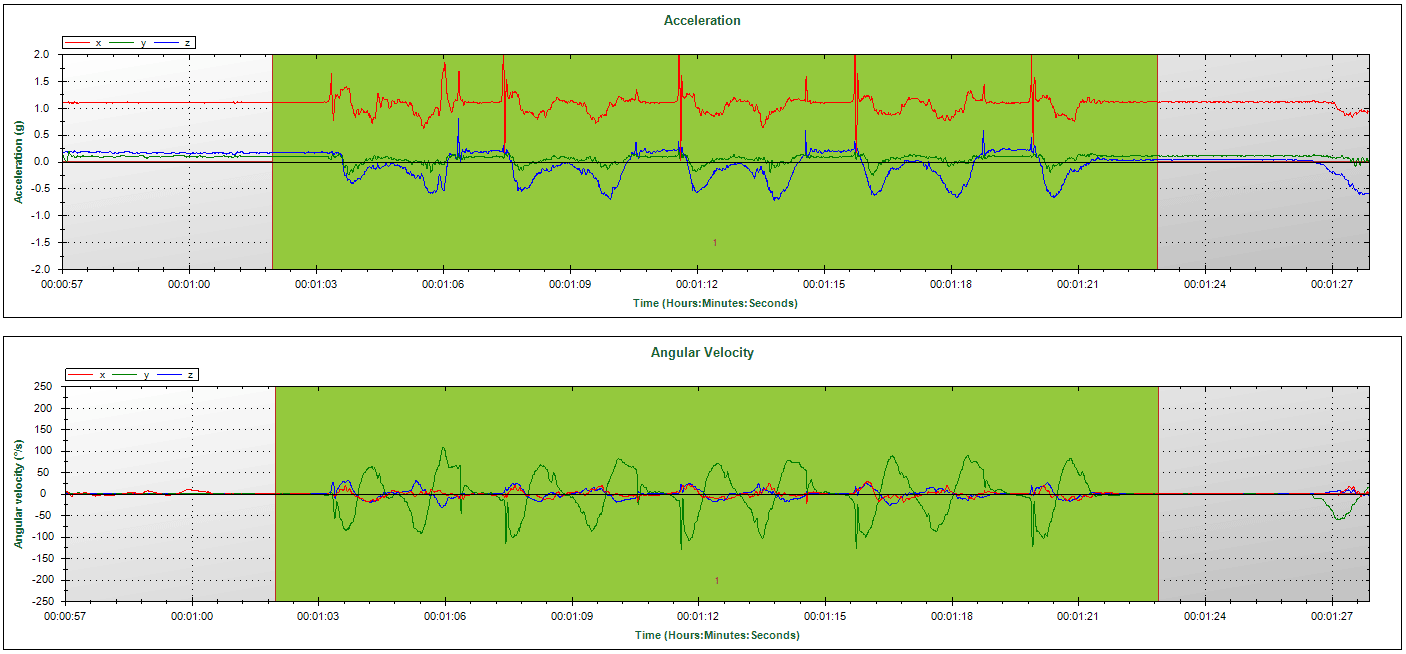
On the examples below, the green planes indicates the marked time intervals. The first test was marked incorrectly because the start marker was set too late (after the movement started). The second test was marked correctly.

Sit-to-Stand Test
• Start and end with back against the chair
• Fully extend the trunk when standing
• End seated against the chair
Timed Up and Go Test
• Start and end seated against the chair
• Walking begins after standing
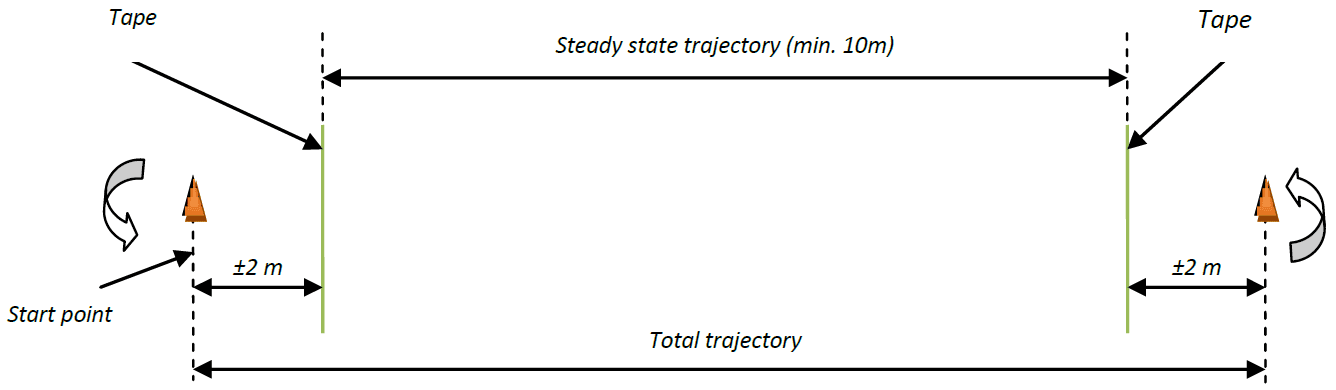
GaitTest
• Walk back and forth between markers
• Mark steady-state walking
It is important to avoid turns in the walking trajectory.
SwayTest
Instructions:
Help subject into position
Provide minimal support
Ask “Are you ready?”
Say “Ready, begin” and mark start
End marker is automatic
Say “Stop”
If balance is lost:
• Stop the trial
• Mark as incomplete
6-Minute Walk Test
• Include clear 180° turns
• Walking aids are allowed
• Resting is allowed
Starting the test will trigger the 6-minute count down. The stop marker is automatically placed after 6 minutes. The test can be terminated earlier if the subject must stop with the test.
Multiple Trials
Ensure clear separation between trials when multiple trials are performed in one MoveTest session:
• Let the subject sit or stand still briefly
• Avoid overlap between trials